Difference between revisions of "Documents/How to Add a Document"
From Commence CRM-Help
m (J.collier moved page Documents/HowtoAddaDocument to Documents/How to Add a Document) |
m (fixed dead-end page; added link back to Documents page) |
||
| Line 18: | Line 18: | ||
[[File:ScreenHunter_82 Sep. 25 14.57.jpg]] | [[File:ScreenHunter_82 Sep. 25 14.57.jpg]] | ||
| + | |||
| + | Return to [[Documents]] | ||
Revision as of 21:26, 7 June 2013
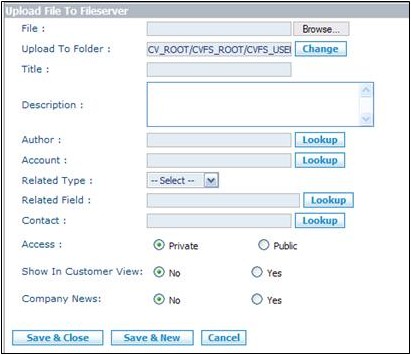
After using the Documents Module Activity Panel to navigate to the folder within which you wish to place a document, click on the “New” button. On the “Upload File to Fileserver” dialog, use the “Browse” button to select a file from your PC. Complete oth-er information and then click on the “Save and Close” button.
1. Use the Folder Tree in the Documents Module Activ-ity Panel to select the folder within which you wish to add a document.
- 2. Click on the “New” button. The “Upload File to Fileserver” dialog will appear.
- 3. Click on the “Browse” button and use your system’s standard “Choose File” dialog to locate and select the document on your PC.
- 4. Tag the folder as “Public” or “Private.”
- 5. Complete the other information fields on the “Upload File to Fileserver” dialog.
- 6. Click on the “Save and Close” button to add your document.
Return to Documents

