Updating your Company Profile
From Commence CRM-Help
As an administrator, you will update your company profile as part of the process to get started using Commence On Demand as well as to modify company, employee and user information going forward.
Contents
Adding Your Company Details
1. Select Accounts from the navigation bar.
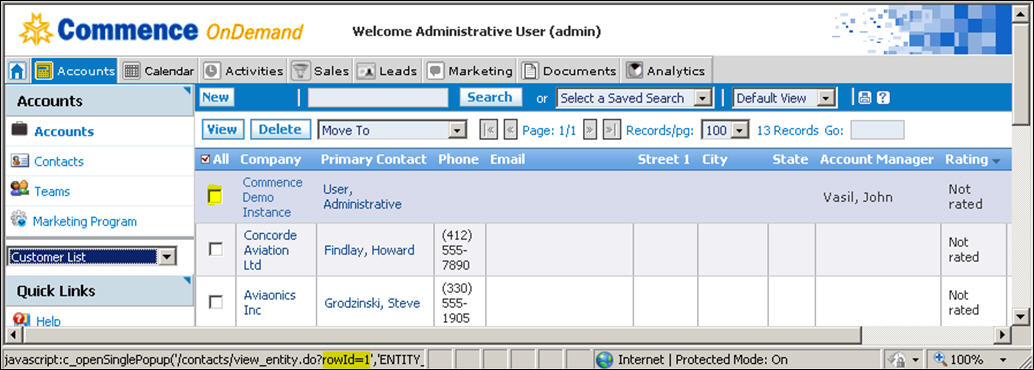
Your company name displays as a blue shaded row in the Accounts view. In the sample screen below, the company profile account is named Commence Demo Instance.
2. Click your company name, or check the box next to the company name and click the View button.
The Accounts dialog displays.
3. Complete all the fields for which you have company information.
4. Click Save when complete.
Adding Employees as Contacts
You must add a contact record for each Commence On Demand employee user at your company. This is required before you can create user accounts. You will add employee contacts in the same Account detail screen from which you updated your company profile information.
1. From the Related Info section of the Account detail screen, select Contacts from the drop-down menu.
2. Click the New Contact button. The New Contact screen displays.
3. Enter the first name, last name, and any other contact information you have for this employee.
4. Click Save & New and repeat step 3 for each employee.
5. Once all your company contacts have been entered, click Save & Close.
Creating Security Profiles
Security Profiles are created to grant or deny users access to specific modules of information and functionality within the system. As an administrator you may establish security profiles by individual, by group or by specific job function.
Note: The default security profile is named Full Access and gives access to all available modules that have been purchased for your company. You may create user accounts using this default profile, and create and assign new security profiles at a future point.
Creating User Accounts
1. From the Quick Links menu, select Administration.
2. From the Administrator menu, select Users.
3. Click the New button. The User Settings screen displays.
4. From the drop down menu, select the user type. Employee is the recommended type for most users.
5. Click the Lookup button to select the corresponding contact. If the contact is not listed, you must complete the procedure for Adding Employees as Contacts.
6 In the User Name field, type the user’s first initial with the last name, all lowercase. The user name must be at least 6 characters long. If first initial plus last name is too short, use first name plus last name.
7. In the New Password field, enter the user name as the password.
8. In the Confirm Password field, enter the user name again.
9. Use the Lookup button to select an appropriate security profile for this user.
10. Select the YES button to enable or activate the new user account.
11. Click Save & New and repeat steps 4-10 to create additional user accounts. The maximum number of users that can be enabled is based on your license agreement.
12. Click Save & Close when you have finished creating new user accounts.
Best Practice: Any employee contact who may have leads or accounts assigned to them must be added as a user. If they are not licensed to use Commence On Demand the user may be deactivated by setting Enabled to No. Disabled users do not count toward your total user limit.

